
How to Aerate a Lawn by Hand?
Aeration may make a world of difference if you wish a rich, green grass. If you prefer not to use a motorized aerator, however, be assured—hand aerating your lawn will provide excellent results.
From basic step-by-step directions to professional advice that streamlines the procedure, this book has all you need to know. Though it requires some additional work, hand aeration is a tried-and-true technique that will help your grass grow more substantial and more healthily. You will have the knowledge and confidence to treat your lawn the way it deserves by the time you finish!
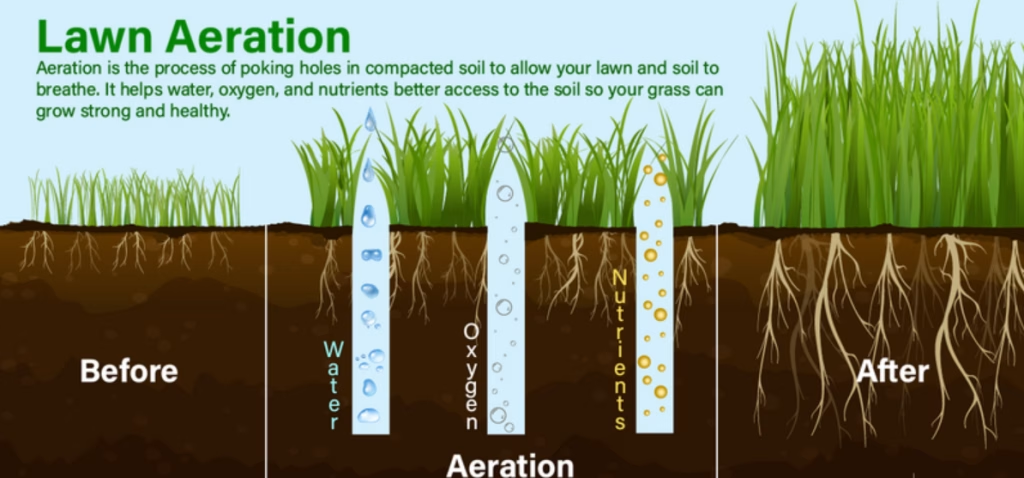
By making tiny holes in the ground, lawn aeration lets water, oxygen, and nutrients more readily reach the roots, promoting grass growth. This easy operation may improve your grass’s beauty and condition.
Although robots may do tasks more quickly, manually aerating allows you more control and helps you truly relate to your grass’s demands. If you’re ready for a hands-on approach, let’s review the tools and procedures to get going!
Tools and materials needed
Make sure you have the correct equipment to accomplish the job correctly before you begin manually aerating your grass. You will need this:
Lawn Aerator: The star of the show is this! Holes in the ground can be made with a manual spike aerator, a core aerator, or even a strong garden fork.
Lawnmower: Cutting your grass ahead of time facilitates the aerator’s easy access to the ground.
Garden Hose & Sprinkler: Watering your grass before aerating softens the ground and greatly simplifies the operation.
Markers: Mark pipelines, sprinkler heads, or anything else you wish to avoid when aerating using little flags or spray paint.
You’re all set to provide your grass with the required treatment once everything is ready!
Step 1: Evaluate your lawn
Spend some time learning the particular requirements of your grass before beginning aerating. This will save you needless effort and enable you to receive the greatest outcomes.
Varied grasses have varied aeration requirements; hence, knowing what is growing in your yard is essential.
- Warm-season grasses (Zoysiagrass and Bermudagrass) they do best when aerated late spring through early summer while they are actively growing.
- Cool-season grasses (like Kentucky bluegrass and fescue) benefit most from aeration in late summer or early fall.
Aerating at the correct time can help your lawn become thicker, healthier, and stronger. The time will be more thoroughly discussed in the next sections.
Figure Out Your Soil Type
The frequency of your aeration depends much on the composition of your soil.
- It becomes more difficult for air, water, and nutrients to reach the roots as it compacts fast. Your lawn will most likely require more frequent aeration if its soil is thick in clay.
- Usually, it does not need aeration as often since it drains efficiently and does not compact as readily.
Knowing the type of soil you are working with helps you to design the ideal aeration program to maintain the greatest condition of your lawn!
| Soil Type | Aeration Frequency |
|---|---|
| Clay soil | Once or twice a year |
| Loam soil | Once a year, in the fall |
| Sandy soil | Every 2–3 years, as needed |
| Compact soil (all types) | Twice a year or as needed |
| Mixed soil (varied) | Assess based on the dominant soil type |
Pay Attention to How Your Lawn Is Used
Every lawn is unique. Hence, your use greatly influences the location and timing of aeration.
- Heavy Foot Traffic: Certain places are more likely to get compacted and may require additional aeration if children, dogs, or regular gatherings keep such areas active.
- Compacted Areas: Should you put tools or automobiles on your lawn, the soil beneath might get compact and call for additional care.
- New Grass? Hold Off! One could say that Give your lawn approximately a year to develop robust if you just sowed it before aerating. This protects fragile, newly formed roots.
- Check Your Roots: In particular, Examining the root depth can help you determine whether your grass needs aeration. It is time to aerate if their depth is less than two inches. Just look with a little shovel or a screwdriver.
Knowing how your lawn is utilized will enable you to concentrate on the areas most in need of aeration, therefore enabling the growth of thick, strong, healthy grass!
Step 2: Choose the type of aeration method
Your grass suffers to develop when your soil is overly compacted, resulting in unkempt and sickly grass. The fantastic news is Aeration can fix this; you don’t need big machinery to accomplish it! Many straightforward, hands-on techniques may work just as well.
Once you’ve evaluated the state of your lawn, it’s time to decide on the finest aeration technique. Every method has advantages; thus, choosing the appropriate one for your lawn will make all the difference. Let us investigate your choices.
Manual Lawn Aeration Methods
Aerating your grass need not be difficult! There are various easy, hands-on techniques to do the task. Here are some choices from which to draw:
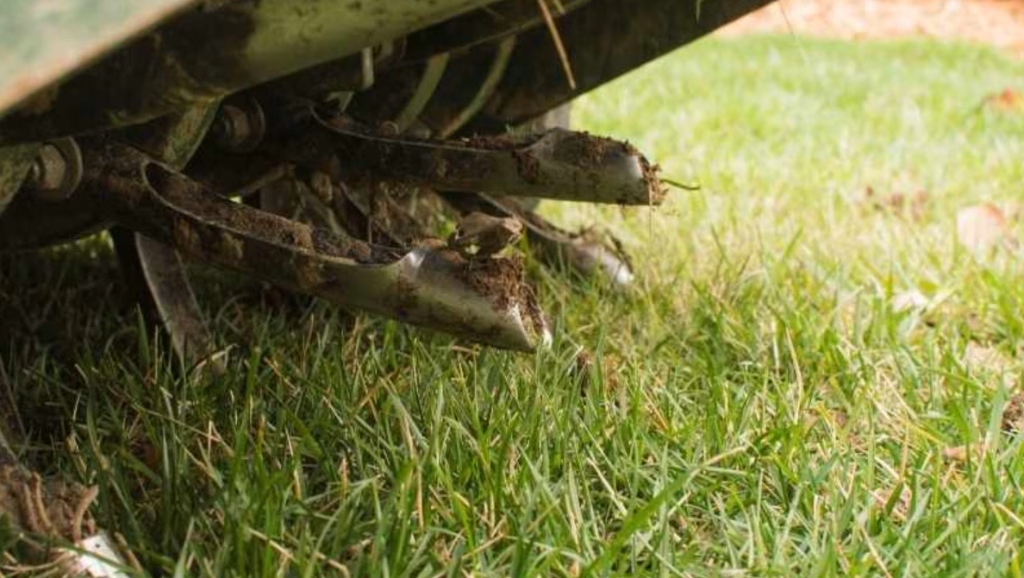
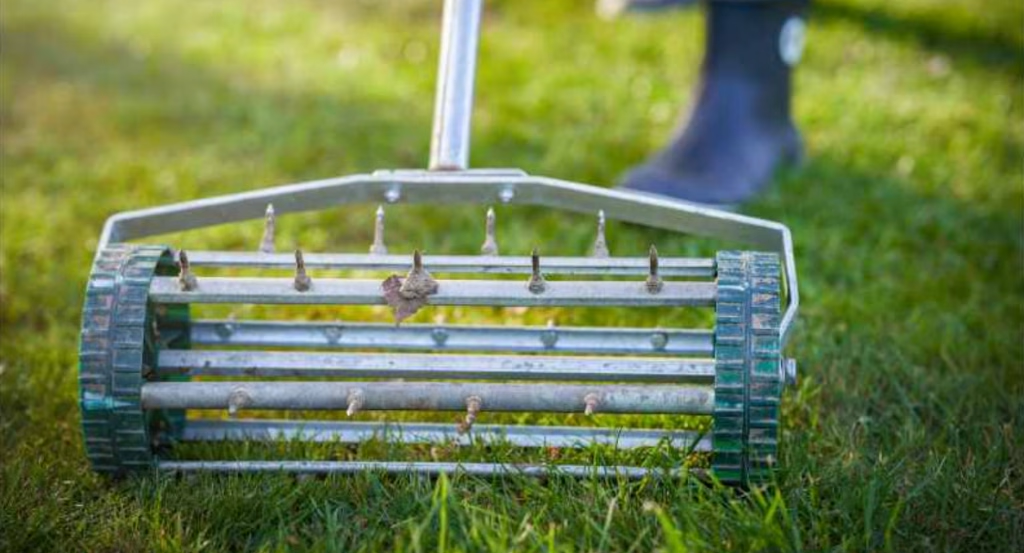
Manual Core Aerator: Among the most efficient instruments available for hand aeration is this one. Its handle and foot bar let you drive it into the ground with your hands and apply more force in compacted sections with your foot. Little soil plugs removed by the hollow tines open space for nutrients, air, and water to reach the roots. Cover your whole lawn fairly for optimum results.
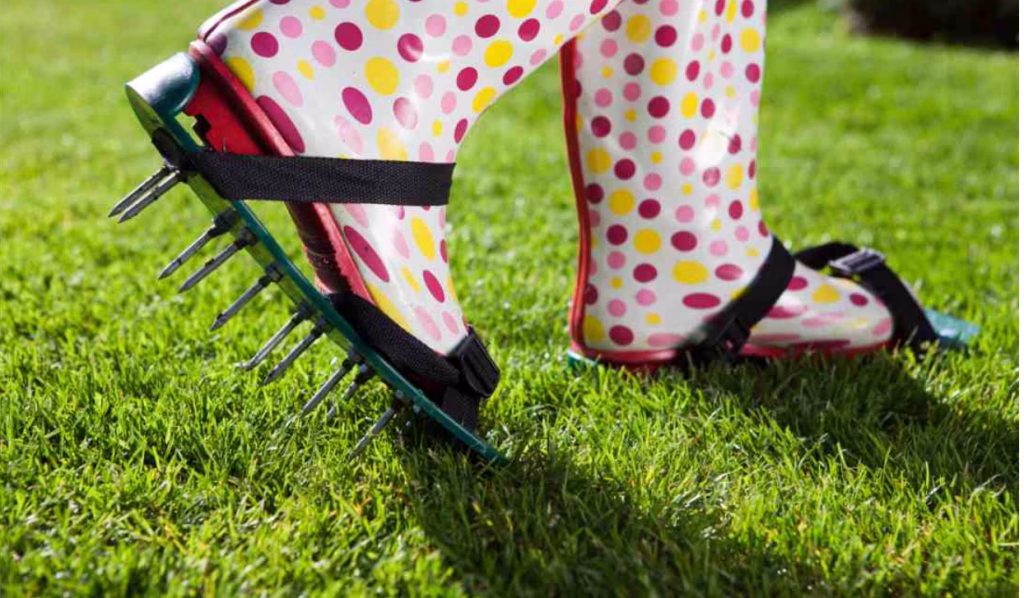
Manual Spike Aerator: Like the basic aerator, it only drills tiny holes in the ground using solid spikes instead of removing plugs. Although it releases compaction, it does not enhance soil structure as well as a core aerator does.
Garden Fork or Pitchfork: A garden fork or pitchfork will be useful whether your grass is modest or you just need to correct compacted areas. Just wriggle the fork gently to break up the ground after pushing it in. Particularly if you already have a fork, this is a simple, reasonably priced solution; but, if you are working on a big lawn, it may be taxing.
Aerator Shoes: While you stroll, want to aerate? Just walking around your yard can help you easily enhance soil drainage since aerator shoes strap on your feet and feature spikes on the bottoms. Though ideal for minor aeration rather than deep soil penetration, they are reasonably priced and handy.
Every technique has advantages and disadvantages; so, pick the one that fits your lawn and the time you wish to spend on it!
Step 3: Prepare your lawn
Good preparation guarantees effective manual lawn aeration. The following are the key pre-aeration procedures:
Get Your Lawn Ready for Aeration
A small amount of preparation before you begin aerating can significantly affect the efficacy of the operation. You must follow these guidelines:
Mow Your Lawn: Before aerating, trim your grass fresh. Depending on the sort of grass you have, cut it down to around 2 to 3 inches. Maintaining the proper height of the grass facilitates the aerator’s straightforward approach to the ground.
Mowing also keeps your lawn looking nice rather than sloppy by preventing those little soil plugs from being caught in tall grass. It also lessens the chance of aerating injuring the grass blades and roots.
Water Your Lawn: Aerating is best when the soil is moist but not soaked. Should the ground be very dry, penetration will be difficult; should it be too moist, it may get muddy and compacted once more.
To get it just perfect, water your grass a day or two before aerating or schedule to aerate the day following a nice rain.
Why is this stage so crucial?
- Easier aeration: Soft soil lets the tines or spikes of the aerator reach deeper, therefore increasing the efficiency of the operation.
- Less strain on tools: Compact, dry soil can be difficult to break through and unnecessarily strains your aerator.
- Better results: Moist soil helps your grass grow stronger and healthier by improving ventilation, water absorption, and nutrient circulation.
A little preparation goes a great distance. By following these easy guidelines before aeration, the operation will go more smoothly, and your grass will maximize its potential.
Mark Sprinklers and Utility Lines
Before you begin aerating, spend some time locating and labelling any sprinkler heads, shallow utility lines, or other hidden obstacles in your yard. This will make the procedure flow more naturally and help prevent any inadvertent injury.
The secret is a few little flags or spray paint—just something to remind you where to avoid. A small precaution today can help you avoid expensive repairs later!
Now that everything is ready, it’s time to start aerating!
Step 4: Aerate the lawn
Your grass is ready; now it’s time to go to work! Use these guidelines to efficiently aerate your grass:
Holding your aerator, push the tines into the ground. Aim for a depth of 2 to 4 inches if you use a manual core aerator; manufacturer’s directions will provide optimal results.
For even aeration, go across your grass two times. The second pass should run at a right angle to the first to produce a checkerboard pattern that more efficiently breaks up compacted ground.
Particularly pay close attention to locations that get a lot of use—such as play areas, walkways, or areas where water typically pools. Go over such places a couple more times if the ground seems particularly hard.
Overlap every pass by around half the breadth of your aerator to ensure you don’t overlook any areas. This guarantees that every inch of your grass receives the required maintenance.
As you go, provide consistent pressure, whether you are using a core or a spike aerator. Using a manual core aerator, the instrument will naturally extract tiny dirt plugs as you work.
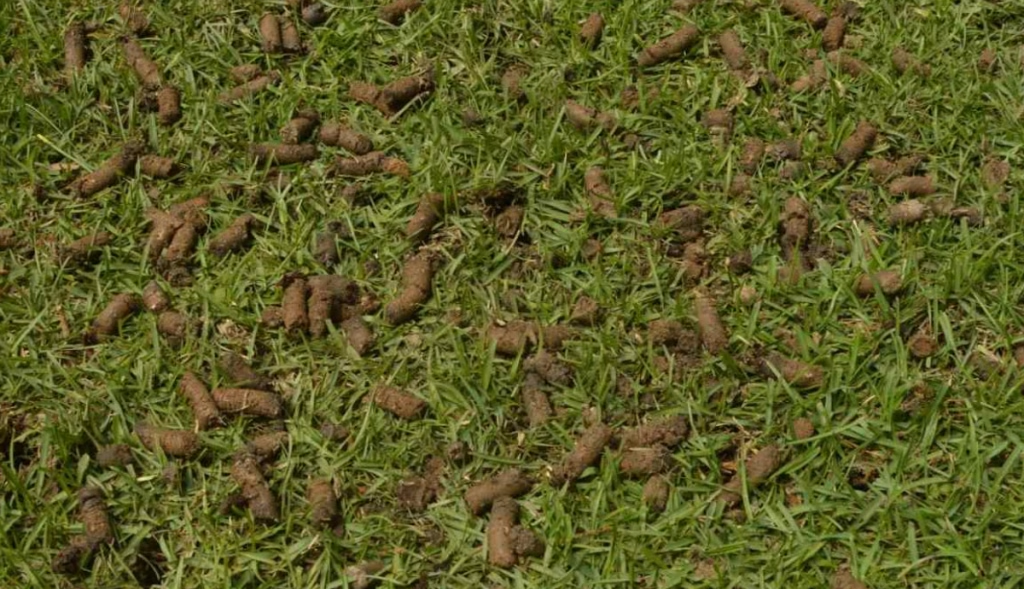
Little dirt plugs will be seen strewn throughout your grass. Leave them where they are! They will break down over time, replenishing nutrients into the soil and therefore strengthening its general composition.
Your lawn will be on its road to improved airflow, stronger roots, and healthier, greener grass with just five easy steps!
Step 5: Leave soil plugs on your lawn
The easy answer is leave them be if you’re wondering whether you should tidy those small soil plugs left behind following aeration.
Give them several days to totally dry out. Once dry, carefully break them apart using a rake or the blunt end of a spading fork to distribute them equally over your grass.
Full with nutrients and organic matter these plugs will naturally break down, therefore enhancing the structure of your soil, lowering thatch, and promoting stronger, deeper root growth.
Step 6: Apply post-aeration care
You have worked hard to aerate; now it is time to assist your lawn to maximize it! A little post-care may much help to guarantee greener, healthier grass.
🌱 Water Lightly –To assist the soil plugs to settle properly, gently water your grass. This also initiates the healing process and facilitates more efficient absorption of nutrients.
🌿 Feed Your Lawn –Aeration offers the ideal chance for fertilization. The nutrients your grass need to get thicker and stronger over time will come from a slow-release fertilizer.
🚶 Take It Easy –Try to avoid high foot traffic or anything else that can compress the ground again over the following few weeks. This provides your grass with the best opportunity for recovery and flourish.
Your grass will show you lush, vivid growth in no time with a little patience and attention.
Does your lawn need aeration?
Compacted soil might be the cause if your grass seems thin, spotty, or dull regardless of the water or fertilizing amount. Aeration supplies the oxygen and nutrition roots need to flourish.
The earth is too thick if you see water pooling or rushing off your lawn instead of sinking into the ground. Aeration makes channels allowing water to get to the roots.
Aeration improves airflow and nutrient absorption, thereby helping your grass recover whether it has had drought, high usage, or pest problems.
Should any of these seem familiar, it’s most likely time for aeration! Giving your grass some breathing room today will result in long-term greener, healthier grass.
When to aerate your lawn?
Maximizing grass aeration requires proper timing, which is mostly dependent on Your grass will most profit here:
🌸 Spring or Fall –Your grass is actively growing and the warm temperature of these seasons provides the optimum opportunity for recovery and growth.
💧 When the Soil is Just Right –Aeration performs best on slightly damp but not soggy ground. Push a screwdriver into the earth to test this basic idea. Your ground is suitable for aeration if it slips readily!
🌱 Before You Overseed –Aerate right before distribution of the fresh grass seed if you intend to overseed. The little perforations enable the seeds to settle in and root more successfully.
📅 Every 1–3 Years –Most lawns do well with aeration every one to three years, but you might have to aerate more frequently if your yard sees a lot of foot traffic from children, dogs, or regular use.
Aerating at the appropriate time makes a significant difference—it helps your grass grow thicker, healthier, and more vibrant!
The ideal aeration time falls with the season of growth for your particular grass kind. Early spring or fall turns out perfect for cool-season grasses. On the other hand, late spring is the best time to aerate warm-season grasses.
Depending on your grass type, here’s a quick guide on when it’s best to aerate your lawn:
| Grass Type | Best Time to Aerate |
|---|---|
| Bermudagrass | Late spring to early summer (Avoid aerating in winter) |
| Fescue | Early fall for strong root growth before winter |
| Kentucky Bluegrass | Early fall for optimal results |
| Perennial Ryegrass | Early fall to support healthy growth |
| St. Augustine Grass | Late spring to early summer (Avoid aerating in the fall) |
| Zoysiagrass | Late spring to early summer during its active growth phase |
The result of your lawn aeration depends on optimal time. Select a season-appropriate for your variety of grass; evaluate the soil type and moisture content, then plan your aeration carefully.
Is Hand Aeration Right for You?
Aerating by hand has ups and downs, just like any lawn maintenance chore. Let’s disentangle it:
Why You Might Love Hand Aeration
- If you want to cut expenses on expert lawn care, manual aerators are reasonably priced and an excellent choice.
- Since you are working by hand, you may concentrate on particularly problematic regions.
- Not noisy, gas-powered machines—just you and your tools, harmonizing with the surroundings.
Why It Might Not Be for You
Particularly if your lawn is big, repeatedly pushing an aerator into the ground can be exhausting.
- Unlike using a machine, this is a slow procedure, so be ready to invest the time.
- Aerating by hand might not be feasible if you have a big lawn unless you’re ready for rigorous exercise.
Small yards or spot-treating compacted areas might find hand aeration to be an excellent option. However, if your lawn is large, you might choose to save time and work by looking at hiring a motorized aerator.
FAQs: Hand Aerating Your Lawn
How do I aerate soil in potted plants?
Aeration helps potted plants just like it helps your grass! Water the soil to soften it, then carefully poke tiny holes throughout the surface with a pointed stick—such as a chopstick or skewer. This keeps your plants healthy by helping to enhance ventilation and water absorption.
Is hand aeration as good as using a motorized aerator?
Hand aeration works nicely for small lawns or particular problem areas. For big lawns, powered aerators are far more efficient and far faster whether hand or machine. The secret to good aeration is to guarantee uniform coverage and use the correct method.
How often should I manually aerate my lawn?
Usually falling in the fall or spring, aeration once a year helps most lawns. To maintain your lawn healthy, though, should it show heavy foot traffic, soil compaction, or water runoff you might have to aerate twice a year.
Frequent aeration encourages improved nutrition absorption, stronger roots, and luxuriant green grass!


